Plan and Prepare
When I set out from Jostedalen in August 2022, fog was so dense I could barely see from one cairn to the next. Twenty-one days later, I walked into Haukeliseter having covered 401.86 kilometres across four Norwegian mountain ranges. What follows is everything I wish I’d known before setting out.
Note: This guide was originally written following my 2022 crossing. It was fully updated in December 2025 to reflect current prices and routes while I was planning my next expedition, Signatur RYGER.
MASSIV is Norway’s long-distance mountain trek. The official route runs 350 kilometres from Sota Sæter to Haukeliseter, traversing Breheimen, Jotunheimen, Skarvheimen, and Hardangervidda. Most hikers take 18 to 21 days, staying in DNT cabins along the way.
I started with no realistic expectation of finishing. That honest assessment helped. Taking it day by day made the distance manageable rather than overwhelming.
Most guides tell you the route. This guide gives you the system you need to finish it.
What MASSIV demands
The Quantified Reality
The route is advertised as 350 kilometres. I tracked 401.86 kilometres, though that includes my approach hike from Jostedalen. Plan for a significant distance and elevation.
Over 21 days, I logged 543,072 steps and 15,941 metres of total ascent. The terrain changes constantly. Day 2 from Nørdstedalseter to Sognefjellshytta was among the hardest sections with 1,838 metres of ascent over 10 hours and 24 minutes.
My full statistics are in a separate post.
Fitness Reality
Extended boulder sections require constant focus on foot placement. By Day 7, I’d spent hours traversing boulders without a break. By Day 10, I was both tired of and enjoying the newfound mastery of balancing on rocks.
The first two days throw 3,500 metres of ascent at you. If your legs aren’t prepared for that, your expedition could be over in two days instead of twenty. Total ascent over the trek is 15,941 metres.
Some experienced fastpackers complete the route in 7 to 10 days. I took 21 days, including two rest days. My reasoning for that timeline appears in the duration section below.
Route and Timing Decisions
Route Direction: Why I Went North-South
I chose north-south, starting from Sota Sæter and finishing at Haukeliseter.
The first two days are commonly known as the hardest. Day 2 from Nørdstedalseter to Sognefjellshytta involved 1,838 metres of ascent over 10 hours. Tackling that on fresh legs made sense, and I can only imagine facing them at the end with knackered legs.
The route flattens progressively. Hardangervidda at the end is noticeably gentler than Breheimen at the start.
Strategy Note: Doing MASSIV North-to-South is a good mind-hack. You tackle the 1,800m ascents of Breheimen while fresh, and cruise the flat Hardangervidda when your body is tired.
Drop-out points also work better going north-south. From Sognefjellshytta, you can easily reach Lom and Luster, and Fondsbu offers another exit. Most people go north-south for these practical reasons.
I’ve heard of plenty of hikers, and met a couple on my way, who went the other way, and I’m sure that works too. For me, though, the logistics weighed heavily in favour of beginning near our place in Jostedalen.
Timing: When to Go
Late July through August offers the most practical window. Cabins open in late June, but early season brings more snow. Most of the route sits above 1,000 metres in elevation. Fannaråken exceeds 2,000 metres, which means there’s a realistic chance of snow earlier in the season.
Later in the season generally means better conditions, especially for the Breheimen section. I hiked in August. Even then, the fog was dense, the weather was cold, and precipitation was non-stop for the first few days. The weather remains unpredictable at altitude.
Temperature swings matter. Finse dropped to 4°C during my August trek. Day 16 brought gale-force rain. On day 18, thunderstorm forecasts had me racing to reach the cabin early to avoid getting struck by lightning.
Duration: Why I Chose 21 Days
I chose 21 days, including two rest days.
From the moment I started thinking of MASSIV, I was adamant about one thing: I wanted ample time for detours, breaks, and sitting quietly, taking it all in. I wanted to see, smell, feel, and enjoy.
This paid off. The hour spent hunting cloudberries on day 17. The detour to St.Paul mountain top. Sitting in silence, watching weather systems cross the landscape. These moments justified every extra day.
Could sections be combined? Absolutely. Some complete MASSIV in 7 to 10 days. I’m delighted I didn’t.
Be true to yourself about your purpose. Efficiency or experience. You choose, but you probably cannot have both.
I planned two rest days: Day 6 at Skogadalsbøen and Day 15 at Geiterygghytta. The timing proved perfect. My rest at Skogadalsbøen meant that knee pain completely disappeared, and my feet recovered. Rest days are not luxuries on a trek this long.
Now, here’s what those 350+ kilometres really looked like:
MASSIV Stage Breakdown: GPS-Verified Data
The table below shows actual GPS-tracked data from my 19 hiking days (excluding two rest days at Skogadalsbøen and Geiterygghytta).
| Day | Route | Distance (km) | Ascent (m) | Time | Destination | Type |
|---|---|---|---|---|---|---|
| 1 | Jostedal - Sota Sæter | 17.11 | 340 | 05h 59m | Sota Sæter | Staffed |
| 2 | Sota Sæter - Nørdstedalseter | 26.19 | 1,690 | 09h 09m | Nørdstedalseter | Staffed |
| 3 | Nørdstedalseter - Sognefjellshytta | 26.30 | 1,838 | 10h 24m | Sognefjellshytta | Staffed |
| 4 | Sognefjellshytta - Fannaråken | 15.88 | 894 | 06h 18m | Fannaråkshytta | Staffed |
| 5 | Fannaråken - Skogadalsbøen | 11.54 | 380 | 04h 19m | Skogadalsbøen | Private |
| 6 | Skogadalsbøen - Fondsbu | 25.01 | 1,058 | 08h 41m | Fondsbu | Staffed |
| 7 | Foundsbu - Slettningsbu | 24.29 | 756 | 06h 39m | Slettningsbu | Self-Service |
| 8 | Slettningsbu - Sulebu | 18.92 | 753 | 06h 01m | Sulebu | Self-Service |
| 9 | Sulebu - Skarvheim | 20.58 | 832 | 06h 17m | Breistølen | Staffed |
| 10 | Skarvheim - Bjordalsbu | 13.33 | 785 | 04h 11m | Bjordalsbu | Self-Service |
| 11 | Bjordalsbu - Iungdalshytta | 16.84 | 465 | 06h 25m | Iungdalshytta | Staffed |
| 12 | Iungsdalshytta - Kongshelleren - Geiterygghytta | 29.54 | 993 | 08h 46m | Geitrygghytta | Staffed |
| 13 | Geiterygghytta - Finsehytta | 16.78 | 684 | 04h 36m | Finsehytta | Staffed |
| 14 | Finsehytta - Krækkja | 24.72 | 797 | 06h 46m | Krækkja | Staffed |
| 15 | Krækkja - Dyranut | 23.53 | 1,069 | 06h 35m | DYRANUT | Staffed |
| 16 | Dyranut - Sandhaug | 24.11 | 644 | 05h 42m | Sandhaug | Staffed |
| 17 | Sandhaug - Litlos | 26.98 | 661 | 07h 11m | Litlos | Staffed |
| 18 | Litlos - Hellevassbu | 17.50 | 552 | 04h 50m | Hellevassbu | Self-Service |
| 19 | Hellevassbu - Haukeliseter | 22.71 | 742 | 06h 33m | Haukeliseter | Staffed |
Note: Day 1 starts from Jostedalen (my family’s place) rather than the official MASSIV start. Rest days not included.
Why UT.no Planning Data Failed
I started planning MASSIV using UT.no’s route data, but quickly switched to Komoot. Here’s a quick comparison of some of UT.no’s estimates compared to GPS reality:
Day 3 (Nørdstedalseter → Sognefjellshytta): UT.no said 24.0km in 8 hours. GPS tracked 26.30km over 10h 24m. That’s 2.3km and 2.5 hours more than planned on one of the hardest days.
Day 15 (Krækkja → Dyranut): UT.no estimated 19.8km. Actual route due to closed cabins at Stigstiv and Trondsbu: 23.53km. Their data doesn’t account for real-world detours.
Day 17 (Sandhaug → Litlos): Planned 24.9km, tracked 26.98km. Another 2km discrepancy.
The ascent data was surprisingly accurate, but distance and time estimates were consistently off. For serious planning, use GPS-verified data or expect significant variations.
The Logistics System
DNT Membership: The Foundation
If you’re not already a DNT member, enrol right away. This is fundamental.
DNT maintains the trails, cabins, and infrastructure that enable MASSIV. Without their work, the route would not exist in its current form. Membership is the right thing to do. In addition, DNT members receive a 30% discount on cabin stays. Over 21 days, this adds up quite a bit. You also gain access to self-service cabins with the DNT key, without which you must bring a full sleeping system. Many people do this, but that’s an entirely different experience from my 7.6kg backpack experience. Join at dnt.no.
Planning: Almost Half the Joy
Planning MASSIV requires at least some level of organisation. Day-by-day cabin bookings, food resupply timing, care package contents and delivery dates, battery management. You need to work out where to charge your watch and phone, size your power bank based on usage patterns, and track it all systematically.
I used a spreadsheet for everything. The planning files and GPX from my actual hike are available in my Downloads section. Those GPX files are field-verified from my 401.86 kilometres of GPS tracking, not theoretical.
But here is something important: planning is almost half the joy. Laying out equipment on the floor, weighing each item, adjusting and reconsidering. Looking forward to the trek whilst the anticipation builds day by day. This preparation phase matters as much as the execution.
My good friend Ole, an experienced hiker, shared the following wisdom when we were discussing the packing list: “You can be comfortable on trail or in camp, not both.” I’ve kept that as a guiding principle ever since.
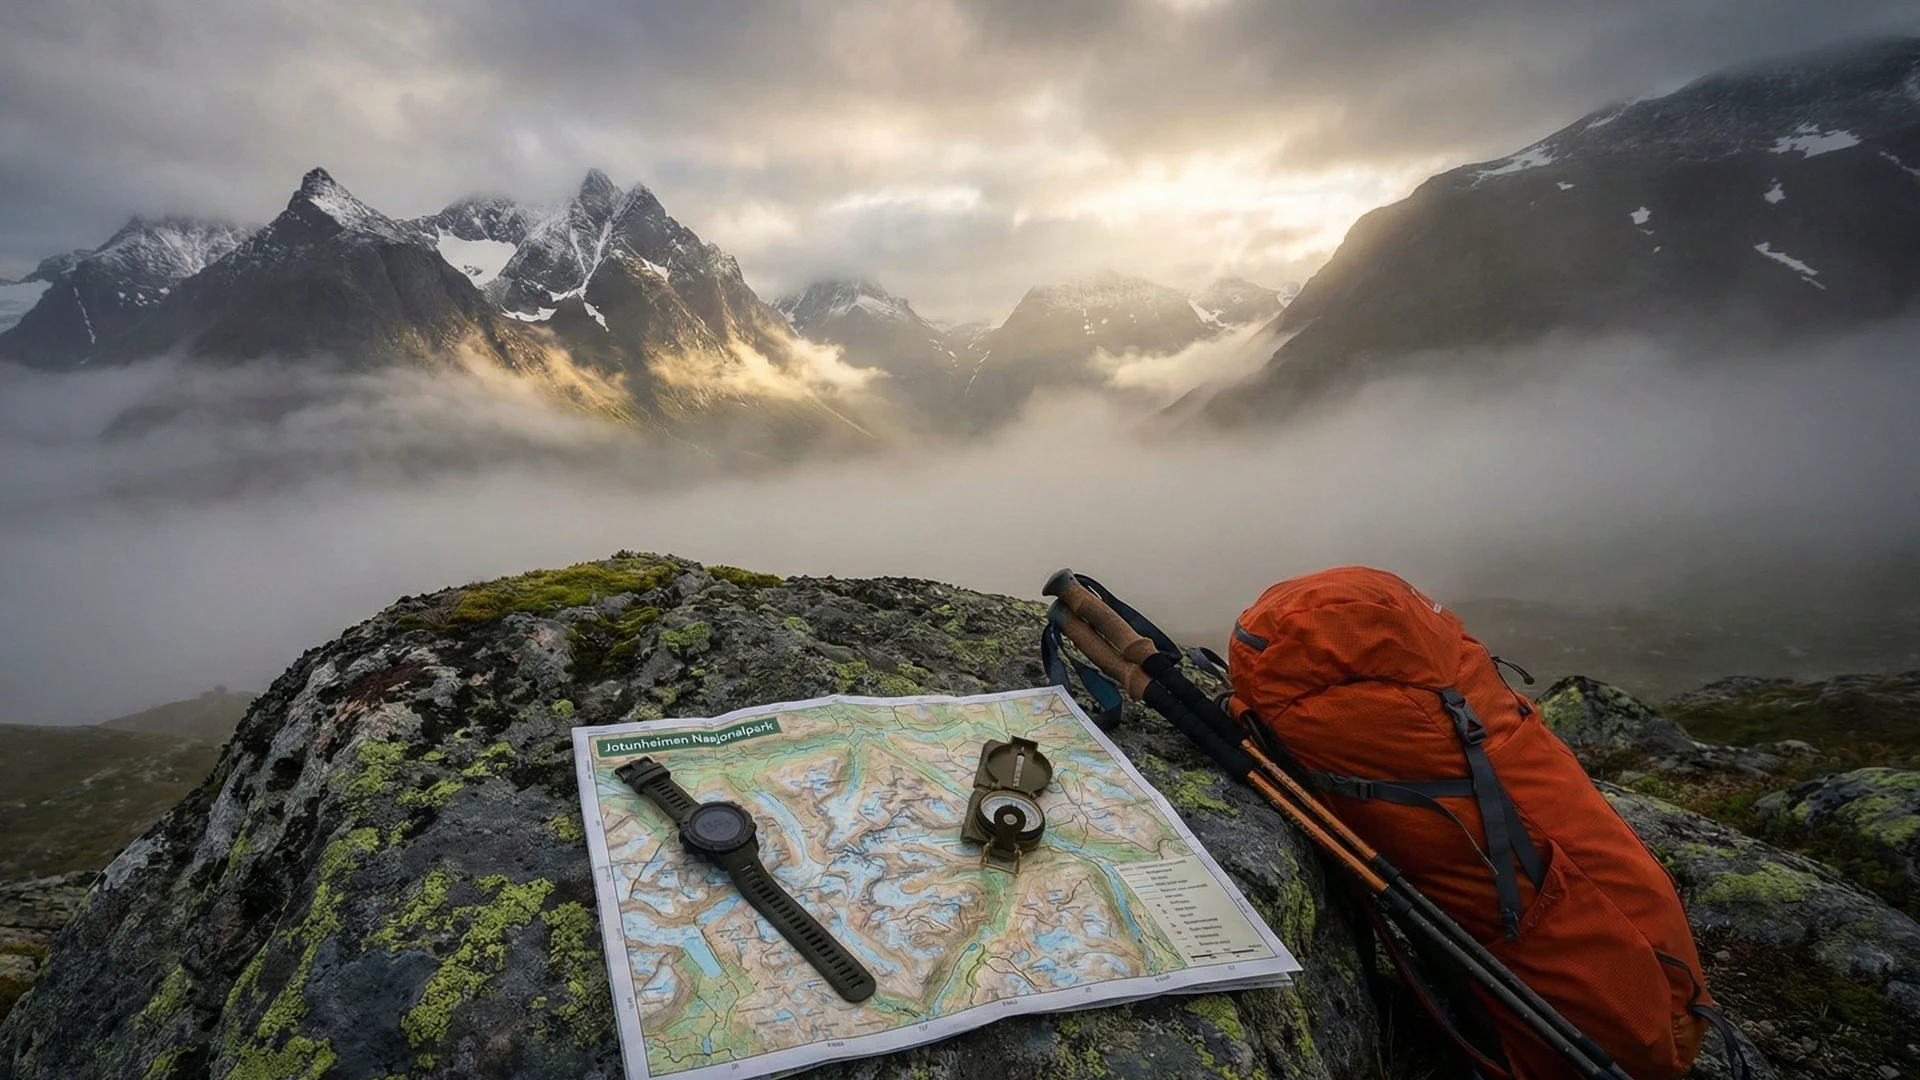
Navigation Preparation: Critical Steps Before Departure
Download offline maps for the entire 21 days before you start. Do this in Norgeskart, Garmin Explore, and any other map apps you have. Download everything you might use. Mobile coverage is scarce across the route. Do not rely on it anywhere.
Equally important is loading GPX trails into the GPS device, watch, and phone before departure. It is actually quite useful when the watch vibrates to alert you when you drift off track, caught up in scenery and miss a turn at an intersection.
Here are the apps I relied on during planning and execution:
Norgeskart for primary navigation. I studied the next day’s section each evening.
Yr (both app and website) for weather forecasting.
Garmin Connect for watch data sync.
Garmin Explore for route visualisation and inReach.
Komoot for route preview and planning.
DNT Hyttebetaling for paying for food and snacks in the self-service cabins.
UT.no and their app had surprisingly little value for me. The GPX trails were incorrect in too many sections, making them dangerous, as the route descriptions did not match reality. I found studying proper maps before departure more reliable, as well as properly reviewing tomorrow’s section on Norgeskart each evening.
Conventional wisdom says bring paper maps and a compass. I went digital-only instead: a Garmin watch and an iPhone with a rugged cover. Lighter pack, higher risk. The redundancy across devices made me comfortable with it.
Cabin Booking Strategy
I deliberately booked all cabins in advance to secure my preferred bed in my preferred room each night. Over 21 days, quality rest matters, and as cabin quality varies quite a bit, from Breistølen’s excellence to Finse’s industrial feeling, the best bed in the best room can make quite a difference to your sleep and recovery.
Don’t worry too much about delays. Your payment remains valid if you’re one or two days late, but you need to arrive at the cabin before three o’clock to keep your favourite bed reserved. After that, it’s up for grabs.
Some cabins get very full. Finse especially. Room sharing happens. Diplomacy helped me secure private rooms when available. I was not put on this planet to share rooms with strangers. I know many others have radically different views on this. It’s perfectly possible to skip pre-booking entirely and sleep wherever there’s room. If it’s full, there’s still always mattresses on the floor. I believe the only exception to this is Fannaråkhytta, where the number of beds is truly limited. My approach was booking ahead for peace of mind and better rest.
Transport and Resupply
Transport is straightforward. Bus to Otta, taxi for the remaining distance to Sota Sæter. At the end, frequent buses depart from Haukeliseter. I booked my return seat plus an extra seat in advance. Since we have a place in Jostedal, I got my father-in-law, brother-in-law and nephew to drive me to Styggvassdammen and join me for the first few kilometres towards Sota Sæter.
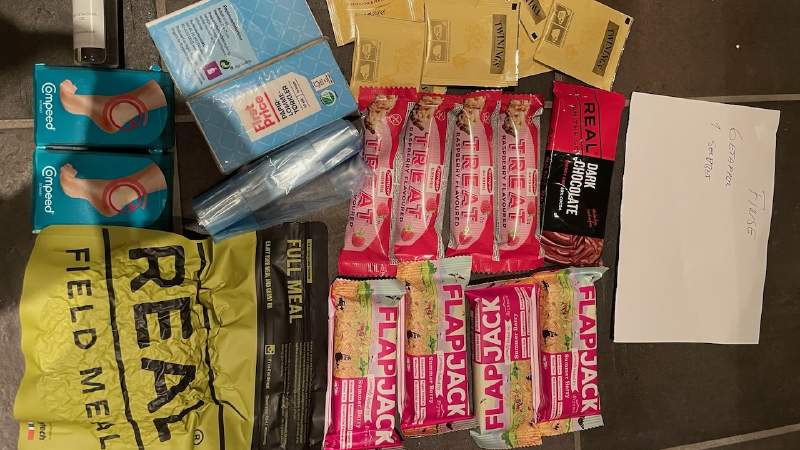
To save weight on the trail, I sent myself care packages to Finse and Breistølen, both of which have road or rail connections. Contents included extra food, snacks, shampoo, and blister aid.
Receiving these on day 15 brought surprising joy. They provide equal measures of weight management and morale boosts. Daily rations of protein bars and chocolate were worth every gram.
Most staffed cabins sell basics, so plan your resupply accordingly. For transport, buses and taxis run regularly. Book ahead.
Budget Planning
DNT membership costs roughly 850 NOK per year. Over 21 days, the 30% cabin discount saves approximately 2,000-3,000 NOK compared to non-member rates.
My total cost in 2022 came to 22,000 NOK, including accommodation, food, care packages, and transport. For current DNT cabin prices and meal costs, check DNT’s official price list.
Physical Preparation
Training Background and Recommendations
For most people, and certainly for me, MASSIV is a formidable physical effort and strain. Thus, being in good shape certainly helps a lot. Fortunately, I’d been into mountaineering and hiking for a few years before I set off, but if you’re starting fresh, I strongly recommend 9-12 months of focused preparation.
I invested in sessions with a personal trainer for exercises tailored to me, not generic hiking plans. This addressed my specific quirks and weak points. This turned out to be a good investment.
There are multiple minor trainings that come for free as well. Balancing on one leg whilst brushing teeth builds stability for boulder terrain. Right leg for the morning brush, left leg in the evening. Strictly no elevators, unless you work in Burj Khalifa.
Specific Training Focus
Balance and ankle strength proved invaluable. Extended boulder sections dominate the first half of MASSIV. In pissing rain, those boulders become slippery. Strong ankles and good balance matter.
Hiking poles proved essential. They take a significant load off your knees going downhill, and they are also brilliant for river crossings. That extra support made wading safer.
Progressive pack weight training helped too. Having done quite a few 15-20km hikes with a 10kg weighted vest in the months before, my body was well adapted to the lighter load of 7.6kg on the trail.
Footwear Strategy: Boots vs. Trail Runners (And Why I Wore Both)
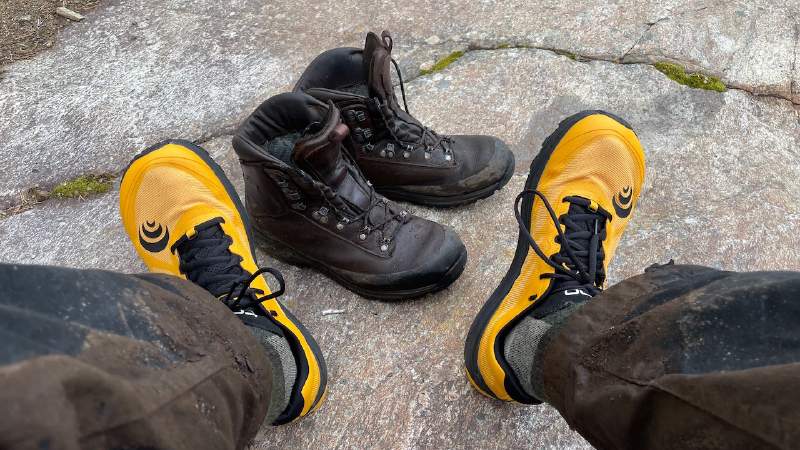
I brought two pairs of shoes: Alfa Impact boots for main hiking, Topo MTN Racer 2 ultralight shoes for rotation. The wide footbox in the trail runners was a blessing, and as a result, I did not get a single blister for the entire 401.86 kilometres. Using preventative blister plasters from day one also helped. Apply them when you start, and keep your heels (and toes) plastered until you reach the final destination. The heel plasters last roughly three to four days each.
The shoe rotation worked because it gave my feet a break from heavier, more constrained boots. Even on the very first day, it was blissful to get out of sheep crap-covered boots and step into soft shoes on the approach.
When I got back home, I had significantly thicker skin on my toes and heels, but no blisters. My clothing system worked perfectly, too. Everything used, nothing missed.
Risk Management and Safety
Emergency Communication. Non-Negotiable
Leave your detailed plan with someone before departure. Mobile coverage is unreliable across MASSIV. Do not count on it. I used a Garmin inReach for the entire trek. My family had my complete itinerary with planned check-in points at each cabin. The inReach allowed frequent position updates and messaging capability regardless of mobile coverage.
I also planned mobile check-in points where coverage might exist as backup in case the inReach failed.
Prepare your loved ones with:
- Day-by-day itinerary with cabin names
- Expected arrival times (buffer generously)
- Emergency contact protocols
- What constitutes “overdue” (I used 24 hours past expected arrival at known cell phone locations)
This is not optional. If you’re three days overdue and nobody knows whether you’re at Finse or still back at Fannaråken, search and rescue has a problem. Give someone your detailed itinerary.
Water
You do not need to bring water almost anywhere. There are ample creeks, rivers, and snow everywhere. The only exception is Fannaråken, which at 2068 meters doesn’t have any water, and thus you need to bring your own. I tend to dehydrate easily and didn’t want to have to stop to rehydrate, so after careful deliberation, I brought a water system in my backpack so I could easily sip some water while hiking. I never filled it more than half a litre, though.
Navigation in Fog
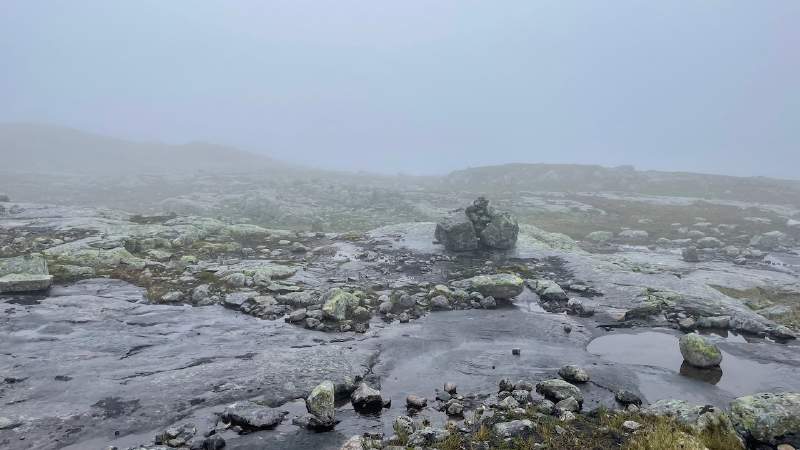
I encountered dense fog during my first few days, and at times I had to wait for it to lift before it was safe to proceed. In steep terrain, stop if you cannot see safely ahead.
I used multiple navigation methods: studying the map, checking GPS position, and following the GPX track on my watch. Progress was slow but cautious. Walking blind on GPS alone is reckless.
Trail Marking Reality
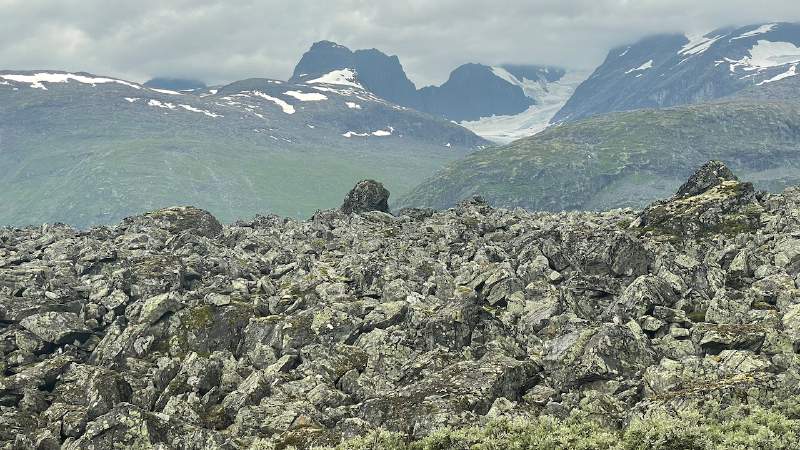
Trail marking quality varies dramatically by region. Some sections have well-built, frequent, visible cairns. Others have sparse marking that appears to run out at higher elevations.
Breheimen’s mountain sections were notoriously poorly marked, though Skarvheimen’s cairns were excellent. Old trail paths had not been properly removed, leaving multiple confusing routes. Ut.no’s map data did not match the actual trail. Following it blindly would have led to narrow ledges with serious fall risks. For this reason, one needs both a proper map and GPX trails together. One without the other is insufficient.
Glacier Crossing
The hike from Sognefjellshytta to Fannaråken involves crossing a glacier. The standard approach is waiting for the guided group, which departs around 12:30. Solo crossings require specialist knowledge and consultation with local guides beforehand. This is not terrain for improvisation. Do NOT cross the glacier alone unless you have proper training and know exactly what you are doing.
Weather Monitoring
Use your inReach or similar device to check forecasts daily. The weather at altitude changes rapidly. August brought dense fog, gale-force wind, rain, and thunderstorms on different days. The temperature dropped to 4°C at Finse.
Trail Practices That Worked
The Routine Philosophy
Routine is not boring. It’s a lifesaver.
Hit the cabin, make the bed, sort the gear. Wash boots, clean poles, rinse the stinking clothes, and hang everything to dry. Set up for tomorrow. Same drill every single day.
The next morning, everything’s already sorted. Pack lunch, go. No mental checklist, no wondering what you forgot.
For example, I brought one fresh T-shirt that was only allowed after a shower. For the majority of cabins without showers, that meant wearing my stinking hiking T-shirt for dinner.
Rest Days and Nutrition
I planned two rest days in advance: Day 6 at Skogadalsbøen and Day 15 at Geiterygghytta. The timing proved perfect.
Rest does not mean staying static. I deliberately hiked 5-10 kilometres on each rest day to stay flexible and agile. Movement matters even on rest days. My knee pain completely disappeared after Day 6. Feet recovered. This validated the rest day strategy. I would caution against skipping the restdays to save time on a trek this long. If nothing else, they also add valuable time to reflect and enjoy.
My doctor warned me about the importance of sufficient salt intake before I set off. Drinking so much water can start flushing your body of salts. I solved this by helping myself to rather greedy portions of salty meat in my lunch packs and by adding more than one spoonful of salt to my breakfast eggs.
Terrain Progression: What to Expect
The Boulder Reality
- Days 2-10: Heavy boulder terrain dominates
- Constant focus on foot placement is mentally draining
- By Day 7: hours of uninterrupted boulder traversal
- By Day 10: tired of, but mastering the balance
- This is why balance/ankle training matters
The Transition
- Days 11-15: Mixed terrain, still challenging
- Breheimen and Jotunheimen: Wild, varied mountains
- This is the dramatic middle section
Hardangervidda Reality
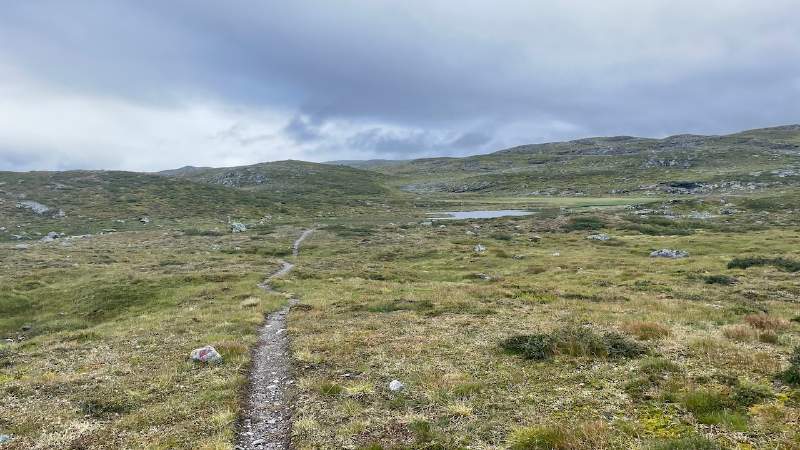
- Days 16-21: Noticeably flatter, gentler
- By Day 16: missing the wild mountains
- Hardangervidda is huge, flat, and honestly quite monotonous
- The hiking equivalent of a German autobahn
- Enthusiasts may over-promise
- This affects duration planning: the last third is less demanding
- If you need to push pace, it’s possible here
- But also where cloudberries and quiet reflection happen
What You Cannot Plan For
Weather is unpredictable. Roughly half of my trek had miserable weather - dense fog, gale-force rain, thunderstorms. I still enjoyed it immensely. Bring proper gear and buffer days.
Cabin quality varies wildly. Breistølen was exceptional. Finse felt industrial. Book ahead if decent sleep matters to you.
Boulder fatigue is real by mid-expedition. Train for balance and ankle strength beforehand.
Next Steps
Planning is half the preparation. Gear selection is the other half.
My Packing List post covers what worked for me. I was leaning quite heavily towards being kind to my back and muscles, so I put a lot of effort into making the backpack as light as possible without compromising security. My post-MASSIV debrief includes recovery guidance (my doctor’s vitamin protocol), reflections on what worked and what didn’t, such as the two-shoe system that delivered zero blisters.
The packing list and planning spreadsheets are available in the Downloads section if anyone wants a head start. Don’t just blindly copy them, though. Remember, half the enjoyment comes from the joy of planning.
And when you finally hit the trail, take it day by day. The mountains are calling. Go!